Frequently Asked Questions
Many of the most common question are also answered on our Started Pullets Page.
Feeds and Feeding
Good nutrition is one of the foundations of a healthy flock.
How often should I feed my chickens?
It’s best to given the fresh feed each day and only put out about the amount of feed that they will eat.
Why wouldn’t you want to fill their feeders with several days of feed?
For several reasons: First, feed will stay fresher in a feed storage bin than in the feeders where it will get more exposure to air and moisture. Fresh feed is more palatable to the chickens and more nutritious for them. Second, putting out excess feed tends to attract rodents, particularly at night.
What type of feed should I feed my chickens?
Chickens have different nutritional requirements at different times in their lives. When they are young, it’s especially important that they get the right kind of feed, with the right balance of protein and other nutrients. It’s also important that they get plenty of feed — that is, that their feed is not restricted.
For young chicks, you’ll need a chick starter. Some manufacturers also make a starter/grower, which is designed to be used both for young chicks and as a grower feed as they get older. Young chicks should also be given access to chick grit, which is available from feed stores.
Once the chicks reach about 5-7 weeks of age, they are ready to transition onto a grower feed (or you can keep them on starter/grower, if that is what you’ve been using). They should be kept on grower up until time of harvest, for cockerels or until point of lay for pullets. Feed manufacturers will usually have recommendations of ages at which to switch feeds which may differ slightly from these — when in doubt, follow the feed manufacturer’s age recommendations.
Once your pullets reach point of lay and you start seeing the first few eggs, you can transition them onto a layer feed. It’s a good idea to also put oyster shells (a calcium source that will help them build eggshells) in a free choice feeder.
Egg Laying
Egg laying is not a mystery - good feed, enough light and maturity will start the egg laying process.
Why aren’t my chickens laying yet?
One of the most common reasons, particularly in late fall or winter, has to do with light.
Most chickens are very sensitive to the amount of light they get and need 14 hours of light in order for the egg laying hormones to be activated. It does vary some by breed, but 14 hours is a pretty good target.
As a point of reference, on January 25th on our farm, we’re getting not quite 9 hours of light that’s bright enough to make a difference. That’ll increase a little each day up through mid-June, when we’ll be getting almost 16 hours.
If you choose to add light, first add 30 minutes of light in the morning. After a week, change to 1 hour of light, and so on, adding 30 minutes each week until you get to 14 hours of light.
Often just adding light will cause them to start laying soon, particularly with new hens that you’ve raised up to 6-7 months of age.
For some other ideas that may help, see below :
Why are my chickens not laying eggs?
A number of things can affect how well your hens lay eggs:
-
Amount of daylight — hens need 14-16 hours of daylight each day to lay their best. In the late fall and winter, the shorter number of daylight hours is one of the most common reasons that your hens may slow or stop their laying. We don’t typically do this because it disrupts the hens natural laying and rest cycle, but if you want to supplement their light to increase laying, you can set up a light to come on a few hours before the sun rises.
-
Temperature — when it’s too hot or too cold, hens may stop laying. The optimal temperature range for them is 55° to 90° (F)
-
Water — chickens should always have good access to clean water. If they run low on water, this can cause stress and reduce laying.
-
Quality layer feed — Hens need a good balance of carbohydrates, protein, vitamins and minerals to lay well. A good quality layer feed with contain the proper balance. If you’ve been feeding your chickens a lot of table scraps or scratch grain, that can throw off the balance and reduce their laying, so use moderation.
-
Stress — Stress will cause your hens to lay less.
-
Molting — When your chickens are molting, they’ll lay less or stop laying. This usually happens about once a year.
-
Age — Most hens will lay well for the first two years, then their egg production will gradually decline up through about year five. To have an ongoing supply of eggs, you’ll need to add new hens periodically.
-
Snakes and Skunks — These can eat the eggs that you are getting. Check your coops more frequently and look for signs that you might be losing eggs to predators.
-
Diseases or Parasites — A hen that isn’t healthy or that’s suffering from parasites may lay less.
How can I get my hens to start laying in their nest boxes?
If your hens are laying their eggs in the floor of the coop or hiding them outdoors, here are a few suggestions:
-
Since hens tend to look for a dark place to lay their eggs, position your nest boxes on the darkest wall of your chicken coop.
-
Try to avoid having light from your chicken coop’s window or door shining directly into the nesting box.
-
Place a few wooden or ceramic eggs in the nesting boxes. When your hens see these, they will start to view the nesting boxes as an appropriate place to lay eggs.
-
It’s best to have nest boxes available in the coop by the time your hens turn about 16 weeks old. That way, they will have plenty of time to explore and get used to the nest boxes and will be more likely to use then once they’ve started to lay.
-
If you weren’t able to get nest boxes in time for them to get trained to the nest boxes, you may still be able to get them to lay in the nest boxes mounted in your coop by training them very gradually, like I’ve done with one of our laying flocks. First, place a nest box in a dark corner on the floor of the coop, with plenty of bedding in it. Put a few ceramic nest eggs in it. After a few days, if your hens have started laying in this nest box instead of on the floor, then raise this nest box an inch or two every few days. Over the course of a few weeks, if you can get your nest box up to the height of your built-in nest boxes, and if the hens are still laying in it rather than on the floor, you can place it right next to your main nest boxes for a week or so. Next, move the ceramic nest eggs out into the adjacent built-in nest boxes. If all is still going well, then after a few days, remove the standalone nest box, and your hens will hopefully now be laying only in your built-in nest boxes.
How do we wash chicken eggs?
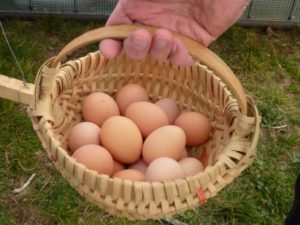
The best way to get clean eggs is to avoid letting them get dirty in the first place. But there are times when that’s not always possible.
How to Keep the Eggs Clean
To get clean eggs to start with, keep fresh bedding in the nest boxes, and plenty of it. Remove soiled bedding as soon as you notice it. Dirty bedding leads to dirty eggs.
The coop floor affects how clean the eggs will be. If the floor of the coop has lots of wet manure on it or mud, the hens will track that into the nest boxes, making the bedding and eggs dirty. If it’s a mobile coop, move it to fresh ground regularly. If it’s a stationary coop, keep fresh bedding on the floor, or use a deep bedding system.
How to Wash Dirty Eggs
You can buy various egg washing equipment and cleaners, but for small scale egg washing, all you need is some sandpaper, a sponge, warm water and some unscented dish soap.
If the egg isn’t too dirty, use a bit of sandpaper to sand off the dirt. This avoids removing the bloom, or cuticle — a protective surface that naturally protects and preserves the contents of the egg.
Water washes off the bloom as well as the filth, so if you wash the egg, you’ll need to refrigerate it afterward. To wash it, use water that’s warmer than the egg. Warm water will heat the egg slightly, causing a little pressure from within. Cold water does the opposite, creating a little suction that can draw dirty water and bacteria through the pores of the eggshell into the egg, so only use warm water (water that’s a bit warmer than the egg).
When do chickens start laying eggs?
The short answer is that most of our breeds will start to lay at around 5 to 7 months. For example, our Black Australorps laid their first egg when they were 26 weeks old (6 months) and were laying very well by 7 to 7 1/2 months.
The Red Star and the White Leghorn tend to start laying around 22 weeks.
Health
Most chicken related health issues can be managed by good feed, good air, good water and clean bedding.
Do I need to worm my chickens regularly?
We normally don’t recommend that you worm your chickens on a regular basis until you have confirmed that they have worms. Chickens are susceptible to several different types of worms, and the treatment varies for those different types.
Also, using wormer can interfere with your chicken’s ability to develop a natural resistance toward worms, as we discuss below.
If it seems like your chickens have worms, you can ask your local veterinarian to do a fecal test. This should be inexpensive and will tell you both if your chickens have a problem and if so, what type of worms they have. Then based on that information, you could treat them with the appropriate wormer.
To a large extent, you can prevent or reduce worm problems by practicing good flock management. If you house your chickens in chicken tractors, then move them regularly to fresh ground. This breaks the life cycle of the worms and reduces the likelihood of the chickens re-injesting the parasites or their eggs.
If you raise them in a stationary coop, keeping the bedding fresh will reduce problems with worms. Also, be sure to wash out waterers regularly and feeders, and make sure your chickens have a good supply of fresh, clean drinking water at all times.
Normally, your chickens will start to develop a resistance against parasitic worms, as long as they’re not being stressed by other problems. You can also have your vet do a fecal test about 4 times a year to monitor worm levels in various seasons. Based on your findings with the fecal test and based on your vet’s recommendations, you may come up with a yearly worming schedule that, together with proper sanitation and management, keeps worm problems under control and, to a large extent, prevents them.
If you’d like to read more about this, Gail Damerow’s book Storey’s Guide to Raising Chickens is a good source of information, along with her Chicken Health Handbook.
Help, my birds are losing their feathers. What’s going on ?
The most common cause of feather loss is the annual molt. This normally occurs when the birds are around 1 year old and may take several months to complete.
It is natural for egg production to be lower than normal during the molt, and it should pick back up again after the molt. The molt usually starts with feather loss around the head then moves to the neck, chest, back and wings. A rooster will lose feathers around his neck and back.
Another cause of feather loss can be nutritional deficiency. Check that the birds have access to the appropriate feed for their stage of development. Check, too, that the feeder is not overcrowded. As your birds mature, your chick feeder may not have enough space for the now older, and larger, birds.
Are you NPIP certified?
Yes. We are certified under the National Poultry Improvement Plan (NPIP).
Our flocks are tested for Pullorum-Typhoid and Avian Influenza (AI).
NPIP is a national program established in the 1930s that is designed to improve U.S. poultry and poultry products. It’s main purpose is to certify that poultry and related products that are to be shipped internationally or across state boundaries are disease free.
Vaccinations
All of the started pullets that we have for sale have been vaccinated against Mareks.
Housing
Chickens are very adaptable. I've seen old vans used as chicken coops, and chicken coops fit for a queen. Many coops that you buy may not have enough ventilation.
What’s the best location for a chicken coop?
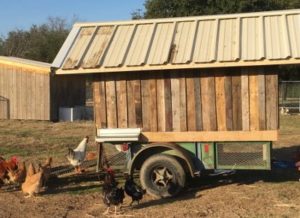
Portable eggmobile that can easily be moved about in the field. With a portable coop, you move it to where ever you need it at the time.
When you’re deciding where to put your chicken coop, here are several things to consider:
Make the coop location convenient for you.
First, you want the coop close enough that it’s convenient for you to gather eggs and feed, water and care for them each day. So you don’t want it too far from your home. But at the same time, their manure can tend to bring flies, so you also don’t want it too close to your home. I’ve found that the more convenient it is to take care of the chickens, the better I care for them and the more I enjoy them.
In hot climates - put the coop under some shade.
Second, consider what your chickens need in addition to feed and water. When it is hot they need shade during the heat. If you can position them under a tree of any kind that provides shade, that will keep them cooler in the summer.
Put the coop where it will benefit the rest of your farm.
Third, consider where and how they can be used symbiotically. In other words, where can I put them that they’ll benefit some other part of my homestead? Some great places to put them are:
- In the orchard — If you have fruit trees, not only can they provide shade, but your chickens will get some food by eating the fallen or low-hanging fruit. And they’ll also eat many of the bugs that would otherwise harm your fruit trees. Too, their manure will enrich the soil around the trees. So putting them in your orchard is a good place. They will scratch through the mulch around your fruit trees, foraging for bugs, if this is a problem, consider using a portable coop / chicken tractor to contain them rather than give them free-range of the entire orchard.
- In your garden during the off-season — After your tomatoes or other crops are done, move your chickens into that part of your garden. They’ll clean up weed seeds and bugs. They’ll lightly aerate the soil. And they’ll leave manure behind that’ll benefit next season’s crops. A portable shelter is a great way to do this. Or use electric mesh netting as a flexible way to contain them in a particular part of the garden.
- On your pasture or lawn — This’ll fertilize your pasture, so that the feed you’re paying for does double-duty. I’ve seen a big improvement to our pasture from rotating our chickens through it in mobile coops or egg-mobiles. The key here is to not leave them in one place too long. I like to move them daily or every few days. This way, the grass gets to rest both from being eaten and trodden down and from their manure. Experiment with the number of chickens, size of coop and frequency with which you move them to get the right balance. You’ll find that it varies somewhat from season to season.
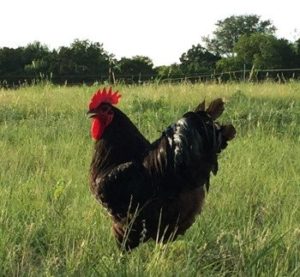
Black Australorp Rooster enjoying the pasture.
Location for a Stationary Coop
If you’re going to use a stationary coop, ideally position it beneath a large shade tree. And, if possible, use a paddock system or some type of portable fence or run around it so that you can give your chickens access to fresh pasture regularly. Fresh ground is one of the most important things you can do to help them stay healthy.
Portable Coops Offer More Flexibility
Better yet, use a portable house that you can move around from season to season, or as the needs of your homestead change. Put it in your garden in summer to clean up after spring garden crops have died off. Move it to your pasture during part of the year (or your lawn, which is essentially a small pasture). Move it into your orchard during the early spring before you start to see worms and other pests headed toward your fruit trees. With a portable coop, you don’t really have to decide up front where to put the coop. You move it where you need it at any given time. That’s been, in my experience, one of the best approaches.
I just finished building a 10x20 foot chicken run. How many chickens can I put into it?
How much space to give your chickens is an important consideration. If chickens are too crowded, they’ll become more susceptible to disease, and they can quickly develop bad habits like pecking.
Many resources recommend that you give your chickens at least 2 square feet per bird. When the birds are young, that is adequate, but as they grow up they need more space. I prefer to give each bird at least 4 square feed if they’re going to be confined to a coop.
We have used hoop coops are 10 feet wide by 20 feet long, or 200 square feet. In them, we start with 100 chicks at 8 weeks old. By the time the birds are 15 weeks old we are keeping only 50 chickens in a coop (4 square feet per bird). Given 4 square feet per bird, the chickens don’t look or act crowded.
Warmth in cold weather?
As the days get shorter, your chickens will spend more time inside. It’s important to keep fresh water and feed available. In cold weather, there’s a temptation to close all the doors and windows to keep them warm, but they really need fresh air and adequate ventilation.
One approach that can work well is the deep bedding or deep litter system. Basically, you keep a thick layer of high carbon bedding, 8″ or deeper on the floor. This can be dried leaves, sawdust or wood shavings or other similar material.
As your chickens drop manure on the bedding and turn it by scratching, the bedding will turn into a living compost pile inside the coop. It will have a clean, earthy smell, and will be quite sanitary. If you start to notice an ammonia smell, then it needs more carbon material added to the bedding. Also, make sure that it doesn’t get too wet. It can tolerate some dampness, but you don’t want it soaking wet.
Guarantee, Ordering and Shipping
We've shipped started pullets to almost every state in the Union.
What is your guarantee?
For shipments of live poultry, we guarantee live delivery and 48-hour survivability and will issue a refund for losses.
We do NOT guarantee one-day delivery. We have no control over the USPS and have never been able to collect on their overnight guarantee. So if your birds take more than one day to arrive, we will not refund the shipping cost, nor will we file for a refund.
Egg laying depends on many factors beyond our control, such as lighting, water, feed and air quality. Because of this, we do not guarantee that our birds will lay eggs by a certain date or at a particular rate.
We want you to be pleased with the birds you receive from us. If you have issues with them, even beyond the 48-hour window of our guarantee, please contact us by email at sales@heritagepullets.com to let us know. We are not able to send replacements because of shipping costs, but in some cases, we can provide a refund.
Can I cancel my order?
Please read our Cancellation Policy.
What are your business hours?
We are a small family farm, and as such we keep the weekends for time with our family. Our business hours are 8 am to 5 pm Monday through Friday. If you contact us outside of those hours, please be patient and we will respond on the next business day, time permitting. We answer questions and contacts in the order in which they are received.
Ameraucana Colored Egg Guarantee
Recently the hatcheries where we purchase our day old Ameraucana chicks have stopped guaranteeing that their Ameraucana will lay colored eggs. Consequently, at this time, we can not guarantee that the birds we raise from their chicks will lay colored eggs.
Miscellaneous
Questions that didn't fit elsewhere.
Are your birds friendly?
How a flock is raised is as important as genetics in determining temperament, so how you raise the chicks will have a large effect on the friendliness of your birds. A flock that receives positive human interaction from day one is more likely to be friendly than a flock with only sporadic human interaction.
Can you explain the terms “cock”, “cockerel”, “hen” and “pullet”?
People use these terms multiple ways in different contexts. On our website “cock” describes a male bird over a year old. “Hens” are female birds over a year old. “Cockerels” are male birds up to a year old, and a “pullets” are female birds up to a year old. This usage is based on how these terms are defined in the APA Standard.
Do you ever have older birds available?
We are sorry, due to high demand we do not have any older birds available.
Can you supply a large quantity of birds ?
We often can supply orders of even 500 birds – but some advanced notice may be required. Again – an email to sales@heritagepullets.com will start the discussion.